Thursday, March 12, 2009

Re-upholster: Dining Chairs

As everyone knows, the economy is not doing well, globally. So, wherever we can, we try not to spend too much. We have a budget for everything and we try really hard to stick to it. So when we saw a dining set which is sold at a fraction of the normal price, we had to grab it. My husband loved the solid wood but the fabric covering the seats? Well, it was a dull brown with some red and orange flowers and get this.. it even had some gold thread peeping through here and there. The 80's here we come. Lets just say, it did not compliment the other soft furnishings that we had and I would not have agreed to buy it if I knew we would be stuck with it. We bought the set with an agreement that we would later re-upholster it. Well, it didn't last a couple of weeks. I just HAD to have it re-upholstered. I'm even surprised that the photo below actually made it look decent (that's because you can't actually see the gold threads, trust me!).


The salesperson at the shop that sold the dining set to us told us that we could have it professionally re-upholstered for about RM30-40 per seat. We had 8 chairs so that would roughly come up to RM240-320. And that does not include the transportation fees of picking them up and sending them back. No way. So my husband and I decided to try and do it ourselves. Here's how we did it:
Just turn the chair over and see where they screw the seat in. Unscrew them. Ours came off pretty easily.


Cut off the material covering the bottom of the seat and put it aside. You will need to put it back on later (cause I'm too lazy.. erm, I mean busy, to find, buy, measure and cut another one :o))

This is what it looks like with the back cover off.

Next, put the upside down seat on the wrong side of the fabric that you would like to use (am I making sense here?). I didn't even bother to take off the old fabric. The thicker the better, I believe :o). Then, cut the fabric to size, so that you have enough fabric to staple to the bottom of the seat. I'm not very patient when it comes to measuring so whenever I can get away with it, I just eyeball it. Believe it or not, I did not even measure the seat before going out to buy the fabric. I'm adventurous like that :o). I just told the salesgirl "I need 2 metres of this.. no, on second thought make that 3, no, 2 and a half would be perfect. Thank you :o)". I know, I drive them nuts sometimes. Haha!

Next, you just pull the fabric taut and then staple, pull and staple, until you turn it over and it looks like this.


After you're happy with that, you can put back the back cover and re-staple it. Please ignore the uneven edges of the cover :o).

And then, just put the seat back on the chair and re-insert the screws.

And we're done! Ahhhh.. that looks much better. And the price: fabric RM60, staple gun RM30, the look on our neighbour's face when she saw what we did - Priceless! :o)

Twigs & Feathers

Sunday, March 1, 2009

For My Princess

Yesterday I shared with you what I made for my little boy, today I thought I'd show you what I've made for my baby girl (well, she's no longer a baby but she's still MY baby :o)). I love making stuff for girls, as I love pinks, and frills, and butterflies.. I decided on a garden theme for the little princess, with butterflies, ladybirds and dragonflies.. sweeeeettt :o)..


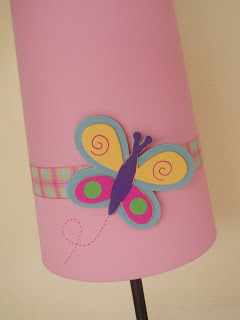
This is the lamp..


The clothes hanger. This time I painted it pink :o).

I searched high and low for a pink clock, but to no avail. This clock was white in colour (the same RM5.90 clock I got for Aiman).. so I spray painted it pink! Easy! :o)

And the sweet pink mirror. Sorry for the blurry photo. Try as I might, I could not take a good photo without getting myself in the reflection :0).


And the boxes for her hairbows and clips and frilly socks.. If I can find them that is! She hides them everywhere! Usually there's one under the sofa, one behind the cushion and if you're not careful there'd be one going into her mouth (yup! the socks too!).


And another growth chart that I made from scratch. I love how it turned out!:o)


A sign for the door just like Abang Aiman's.. :o)

And last but not least, a pink wastepaper basket. Oh, I've got to share this with you. I showed the basket to Amira, pointing at the butterfly, I asked, "what's this?". To which she answered,"ba-fy". I was so proud. Then I pointed at the ladybird and asked again, "what's this?". She confidently replied "ipash, mama!" (coachroach, mama!). Hahaha! I didn't know whether to laugh or cry!

My sweet, sweet girl.. she's such a bundle of joy! I hope she'll grow to love them. Enjoy Amira, mama loves you! :o)


Twigs & Feathers